Applying MVC
MVC fundamentals
Model-view-controller (MVC) is a software architectural pattern that attempts to separate application data, business logic, and presentation.
As originally formulated by Trygve Reenskaug at Xerox PARC, the architecture consists of:
- Thing: "Something that is of interest to the user." (A real-world concept, e.g. ledger, grade report, time card.)
- Model: "An active representation of an abstraction in the form of data in a computing system." (Abstraction of the Thing.)
- View: "One or more pictorial representations of the model." (In our case, this can be a visual format like HTML or PDF, or even a machine-readable data type like XML or JSON.)
- Controller: "An interface between a user and one or more Views."
MVC has become the best-known architectural pattern for web-based applications, in part because its separation of concerns (data, logic, presentation) mirrors the typical separation of roles in a large organization or development team (DBA, middleware, front-end developer).
The "Front Controller" pattern
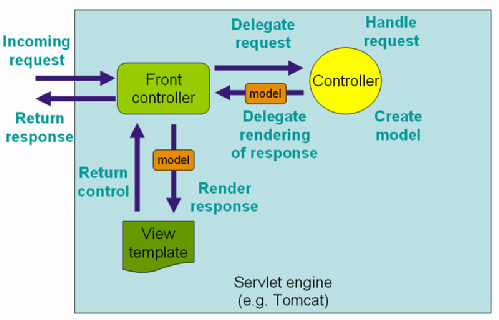
There are many variations of the basic MVC pattern. The standard JSP/servlet environment has been designed around the MVC1 (page-based) and MVC2 (servlet-based) patterns. Spring MVC implements a variation called the "front controller" design pattern, which is illustrated in the diagram above.The front controller (implemented by the DispatcherServlet in Spring-speak) handles incoming requests. The DispatcherServlet will find the appropriate Controller class to handle the business logic for the request, based on rules specified by the developer. The DispatcherServlet then delegates the handling of the business logic to an instance of the appropriate Controller. The Controller returns the model and specifies the view template for the response (usually implemented with JSP). The DispatcherServlet then handles the actual rendering of the response and returns the response to the client.
The developer, through convention, configuration, or coding, is responsible for:
- Mapping incoming requests to the front controller (web.xml and annotations)
- Creating Controllers as needed and mapping request URLs to Controllers
- Creating beans to encapsulate model data as required
- Creating views
- Single point of access for handling requests, which helps with authentication, authorization, and navigation.
- Centralizes business logic and (potentially) facilitates reuse
- Easy to implement multiple views
Spring MVC in a nutshell
The following "cheat sheat" will work for the default skeleton webapp created by the UXT setup wizard.
DispatcherServlet: Map this to a path or file extension in web.xml.
This example maps the DispatcherServlet to all requests ending in .htm:
<!-- spring dispatcher servlet -->
<servlet>
    <servlet-name>myblink</servlet-name>
    <servlet-class>
        org.springframework.web.servlet.DispatcherServlet
    </servlet-class>
    <init-param>
        <param-name>contextConfigLocation</param-name>
        <param-value>/WEB-INF/config/controller.xml</param-value>
    </init-param>
    <load-on-startup>1</load-on-startup>
</servlet>

<!-- spring dispatcher servlet mapping -->
<servlet-mapping>
    <servlet-name>myblink</servlet-name>
    <url-pattern>*.htm</url-pattern>
</servlet-mapping>
This example maps DispatcherServlet to all requests under /my/path:
<servlet-mapping>
    <servlet-name>myblink</servlet-name>
    <url-pattern>/my/path/*</url-pattern>
</servlet-mapping>
Views: Create JSP files under /WEB-INF/jsp. In the default configuration the skeleton webapp uses a name-based view resolver -- when creating a ModelAndView object (see below) you can specify a name like "home" and the DispatcherServlet will look for /WEB-INF/jsp/home.jsp automatically. We'll get to the details of displaying data within the view JSP later.
org.springframework.web.servlet.ModelAndView. Add a @RequestMapping annotation to those methods. Add the Java packages containing your controller classes to the /WEB-INF/config/applicationContext.xmlfile.
Familiarize yourself with the many constructors of org.springframework.web.servlet.ModelAndView.
Example: This very simple controller invokes, returns and displays /WEB-INF/jsp/home.jsp in response to requests for /YourApp/home.htm:
@Controller
public class SampleController {
    @RequestMapping("/home.htm")
    public ModelAndView handleRequest(HttpServletRequest request, HttpServletResponse response) throws Exception {
        return new ModelAndView("/home");
    }
}
The example above uses one of the simplest constructors for the ModelAndView object -- passing a single string with the name of the view JSP. Note there is no superclass, concrete or abstract, nor are any interfaces implemented ... everything's done through annotations and reflection.
Example: You want to display the data from JLink business object "myBO" with the view /WEB-INF/jsp/myview.jsp ... Here's how to create a ModelAndView object:
@Controller
public class SampleController {
    @RequestMapping("/myview.htm")
    public ModelAndView handleRequest(HttpServletRequest request, HttpServletResponse response) throws Exception {
        return new ModelAndView("/myview", myBO.getProperties());
    }
}
The example above uses another constructor for ModelAndView -- passing a string with the name of the view JSP, and an instance of java.util.Map as the data model.
Views revisited: Here's how to get data out of the model and into the view.
The data you passed in the model can be accessed as properties of the view JSP. The simplest way to retrieve and display these properties is through the JSP Standard Tag Library (JSTL). For example, if your business object had values associated with keys "firstName", "lastName", and "balanceDue", you could display these with:
<c:out value="${firstName}" escapeXml="true" />
<c:out value="${lastName}" escapeXml="true" />
<c:out value="${balanceDue}" escapeXml="true" />
In other guides you will examine more advanced examples and techniques, including form binding and non-HTML views. Good luck!